

I saw these cookies last year just after the Halloween and made a mental note to make it next year( which is now) but I forgot to save the recipe so I searched for one and found this really cool witches’ fingers cookies. My cookies didn’t turn out as spooky good but I had fun time trying and the kids liked it so much especially the “nail” part!
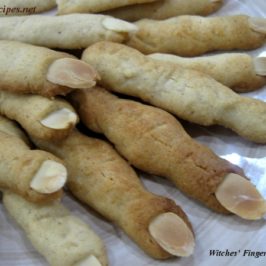
The original recipe calls for vegetable shortening (i.e Crisco) but I used butter and that’s the reason why my fingers cookies didn’t hold it’s shape and were crumbly.

I love how the almond slivers look like real nails! I didn’t use parchment paper, I just grease the baking pan well with shortening, it works 😉

You may use melted dark chocolate to color the nails but I didn’t bother with it, I can’t even put nail polish on mine hahaha 😀
WITCHES’ FINGERS COOKIES RECIPE
adapted from Julia M. Usher’s Cookie Swap: Creative Treats to Share Throughout the Year; see original recipe here
note: this recipe is half of the original and makes about 3 dozens cookies- Olive
Ingredients:
1-1/4 cups all-purpose flour
1 tsp ground cinnamon
1/2 tsp salt
1/2 cup (1 stick) + 1 tablespoon butter
1.5 oz cream cheese, room temperature
6 tablespoons cup granulated sugar
2 tablespoons cup light brown sugar
1 egg yolk
1/2 tsp vanilla extract
almond slivers, for the “nails”
Directions:
Position a rack in the centre of the oven and preheat the oven to 350°F. Line two or more cookie sheets with parchment paper or grease with butter or shortening ( better)
Combine the flour, cinnamon, and salt in a small bowl. Set aside.
Place the butter and cream cheese in the bowl of an electric mixer fitted with a paddle attachment and beat on medium speed until smooth. Gradually add the sugars and beat 1-2 minutes longer, or until light and fluffy. Add the egg yolk and extracts, and mix until well combined. Scrape down the sides of the bowl as needed to ensure even mixing.
Turn the mixer to low speed and gradually add the dry ingredients, mixing just until combined.
Fill a pastry bag with the cookie dough and cut the tip off or use a 3/8″-round pastry tip. Cover any dough that is not in use with plastic wrap to keep it from drying out.
For the most life-like fingers, pipe the cookies no more than 2/3 the width of an actual adult finger, as the dough will spread during baking. Apply varying pressure as you pipe to create wrinkled “knuckles.” If desired, score deeper wrinkles into the knuckles with a paring knife, taking care not to cut completely through the cookies.
Press an almond sliver into one end of each cookie to make the “nail.”
Bake 10-12 minutes, or until very lightly browned. About midway through baking, press any almonds that have shifted back into place. While the cookies are hot from the oven, gently push in the sides to make the fingers more three-dimensional. (The cookies will spread and flatten a little during baking.) Let the fingers cool on the cookie sheets until they can be easily moved without breaking, about 3-5 minutes. Carefully transfer to wire racks with an offset spatula and cool completely before storing.
Witches' Fingers Cookies
Ingredients
- 1-1/4 CUPS All-Purpose Flour
- 1 TSP GROUND CINNAMON
- 1/2 TSP SALT
- 1/2 CUP 1 STICK + 1 TABLESPOON BUTTER
- 1.5 OZ CREAM CHEESE ROOM TEMPERATURE
- 6 TABLESPOONS CUP GRANULATED SUGAR
- 2 TABLESPOONS cup Light Brown Sugar
- 1 EGG YOLK
- 1/2 TSP VANILLA EXTRACT
- ALMOND SLIVERS FOR THE “NAILS”
Instructions
- POSITION A RACK IN THE CENTRE OF THE OVEN AND PREHEAT THE OVEN TO 350°F. LINE TWO OR MORE COOKIE SHEETS WITH PARCHMENT PAPER OR GREASE WITH BUTTER OR SHORTENING ( BETTER)
- COMBINE THE FLOUR, CINNAMON, AND SALT IN A SMALL BOWL. SET ASIDE.
- PLACE THE BUTTER AND CREAM CHEESE IN THE BOWL OF AN ELECTRIC MIXER FITTED WITH A PADDLE ATTACHMENT AND BEAT ON MEDIUM SPEED UNTIL SMOOTH. GRADUALLY ADD THE SUGARS AND BEAT 1-2 MINUTES LONGER, OR UNTIL LIGHT AND FLUFFY. ADD THE EGG YOLK AND EXTRACTS, AND MIX UNTIL WELL COMBINED. SCRAPE DOWN THE SIDES OF THE BOWL AS NEEDED TO ENSURE EVEN MIXING.
- TURN THE MIXER TO LOW SPEED AND GRADUALLY ADD THE DRY INGREDIENTS, MIXING JUST UNTIL COMBINED.
- FILL A PASTRY BAG WITH THE COOKIE DOUGH AND CUT THE TIP OFF OR USE A 3/8″-ROUND PASTRY TIP. COVER ANY DOUGH THAT IS NOT IN USE WITH PLASTIC WRAP TO KEEP IT FROM DRYING OUT.
- FOR THE MOST LIFE-LIKE FINGERS, PIPE THE COOKIES NO MORE THAN 2/3 THE WIDTH OF AN ACTUAL ADULT FINGER, AS THE DOUGH WILL SPREAD DURING BAKING. APPLY VARYING PRESSURE AS YOU PIPE TO CREATE WRINKLED “KNUCKLES.” IF DESIRED, SCORE DEEPER WRINKLES INTO THE KNUCKLES WITH A PARING KNIFE, TAKING CARE NOT TO CUT COMPLETELY THROUGH THE COOKIES.
- PRESS AN ALMOND SLIVER INTO ONE END OF EACH COOKIE TO MAKE THE “NAIL.”
- BAKE 10-12 MINUTES, OR UNTIL VERY LIGHTLY BROWNED. ABOUT MIDWAY THROUGH BAKING, PRESS ANY ALMONDS THAT HAVE SHIFTED BACK INTO PLACE. WHILE THE COOKIES ARE HOT FROM THE OVEN, GENTLY PUSH IN THE SIDES TO MAKE THE FINGERS MORE THREE-DIMENSIONAL. (THE COOKIES WILL SPREAD AND FLATTEN A LITTLE DURING BAKING.) LET THE FINGERS COOL ON THE COOKIE SHEETS UNTIL THEY CAN BE EASILY MOVED WITHOUT BREAKING, ABOUT 3-5 MINUTES. CAREFULLY TRANSFER TO WIRE RACKS WITH AN OFFSET SPATULA AND COOL COMPLETELY BEFORE STORING.


